
A custom wood frame added to an existing mirror runs about $28 in materials and takes 6 steps from cutting the miter joints to finishing with paint or stain.
Most people skip the indent cut that holds the glass in place, which leaves the mirror sitting loose inside the frame. The indent runs ¼ inch deep and is routed into 1 × ½-inch pine strips before assembly.
1. Frame an Existing Mirror with Custom Wood
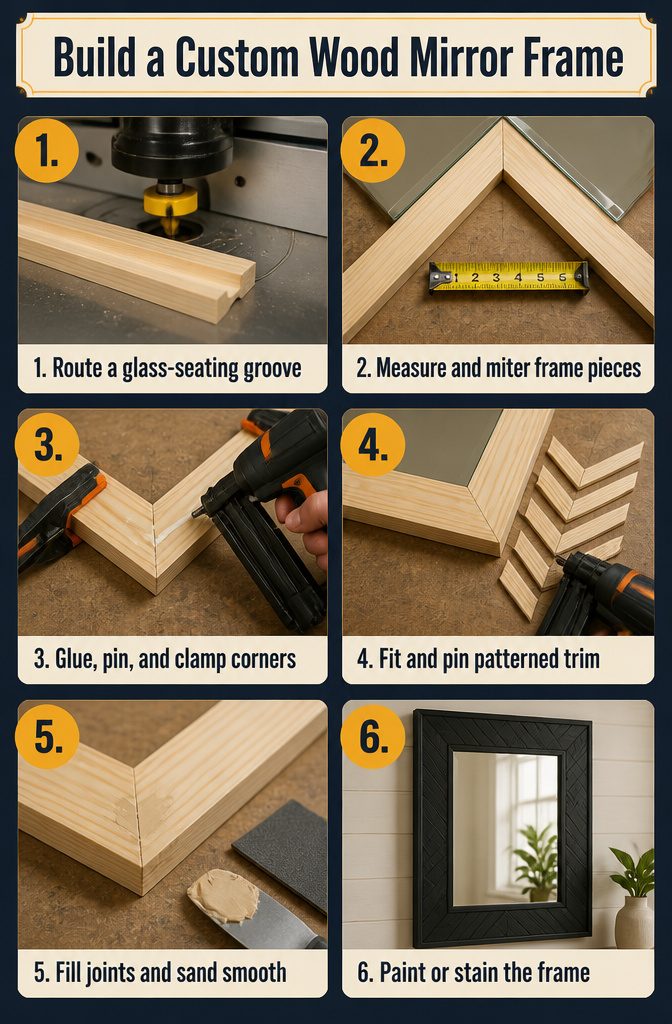
- Cut a ¼-inch indent into 1 × ½-inch pine strips using a router table. This indent is where the glass sits.
- Measure your mirror and cut the first piece of framing at a 45-degree angle. Measure along the inside edge—if your mirror is 12 inches, the inside edge should match that length—then make the second 45-degree cut in the opposite direction. The outside edge will run 1 inch longer because of the miters, so a 12-inch mirror produces a 13-inch outer edge.
- Apply wood glue to all joints, shoot a pin nail through each corner with a pin nailer, and clamp until set.
- Cut ½ × ¼-inch pine strips at various lengths with opposing 45-degree angles. Lay them out until the pattern works, then pin-nail them onto the frame.
- Fill all joints with wood putty and sand smooth once dry.
- Paint or stain the frame. Black Coal paint is one option if you want something dark and modern.
2. How Factory Mirrors Are Made

Factory mirrors start with float glass in 5 mm thickness for commercial use or 3 mm for small decorative frames. Low-iron glass costs more but cuts the faint green tint ordinary float glass carries.
The manufacturing process runs through eight steps:
- Select float glass. Low-iron glass produces a clearer reflection; standard float glass works when tint won’t show.
- Clean the surface. High-pressure washing with deionized water removes dust, oils, and residue that would block adhesion.
- Apply the reflective coating. Silver or aluminum is deposited chemically across the back of the glass. Silver reflects more light and stays neutral in color.
- Add copper backing over silver. The copper layer protects the silver from oxidation and physical wear.
- Spray two coats of protective mirror backing paint. This seals the metal layers against moisture and scratching.
- Cure under controlled heat. The paint hardens at a set temperature, bonding the protective layers permanently.
- Score and cut the glass, then finish the edges. Mirrors are sized to order and edges polished or seamed to prevent chipping.
- Inspect and pack. Each sheet is checked for coating defects, scratches, or color shifts before it leaves the line.
3. Cut a Geometric Frame from Plywood

- Mark a 14-inch circle on a 2 × 2-foot piece of plywood, centered and at least 2 inches smaller than the 16-inch mirror that will sit on top. A compass or string-and-pencil rig keeps the line accurate.
- Drill a starter hole just inside the circle line, then cut along the mark with a jigsaw. The starter hole gives the blade room to enter without splintering the edge.
- Sand the cut edge smooth with 180-grit sandpaper, then coat the plywood with primer and follow with black spray paint. Two thin coats read cleaner than one heavy pass.
- Spread mirror adhesive in a bead about ½ inch from the circular opening, then press the mirror into place carefully. Work from one edge and lower it slowly to avoid trapping air underneath.
- Attach picture-hanging hardware on the back once the adhesive cures. A sawtooth hanger works for lighter mirrors; the whole project runs about $28 in materials.
4. Frost a Pattern with Spray and a Doily
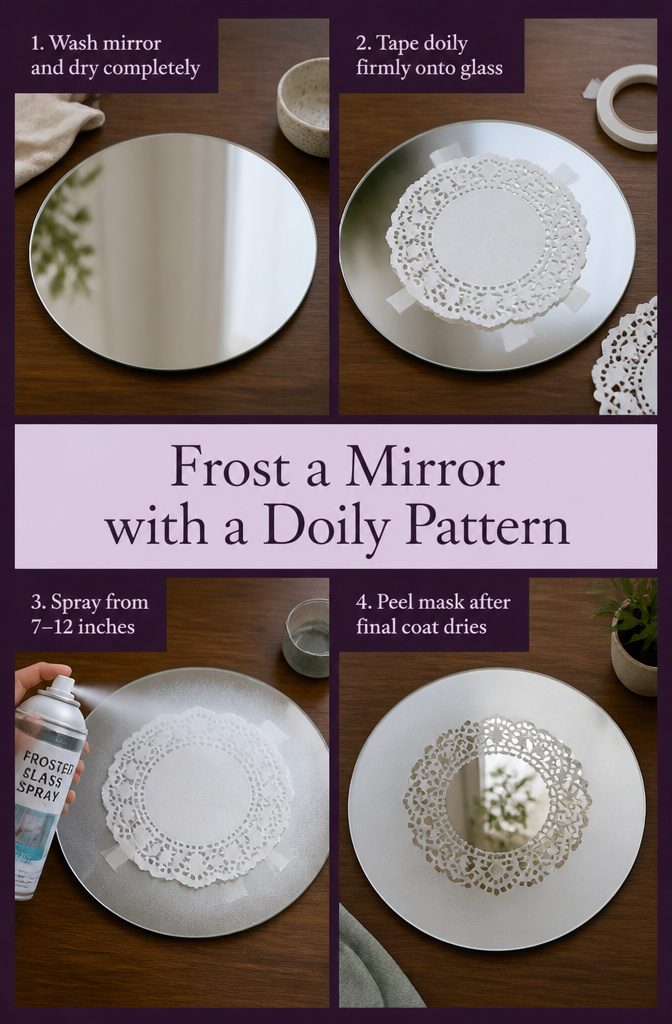
- Clean the mirror with soap and water to remove any debris or dirt, and let it dry completely before you start.
- Choose a paper doily that’s about a third of the size of the mirror. On the back of the doily, apply double-sided tape generously—you want enough to block the spray from bleeding through, but avoid covering any of the open areas in the lace pattern. Press the doily firmly onto the mirror wherever you want the reflection to remain visible. Everything outside that spot will frost.
- Lay the mirror flat. Shake the frosted-glass spray and apply it 7–12 inches away in even, sweeping strokes. Thin coats prevent drips. Wait 10–15 minutes between coats. Four coats gave the opacity I was after.
- Once the final coat dries, peel off the doily and tape gently. Wipe down with a damp cloth and hang.
5. Apply Film for a One-Sided Mirror Effect

Two-way mirror film sticks to ordinary glass or an existing window and takes a few minutes to apply, then a few days to dry completely.
You position the film on one side of the glass, spray water or soapy solution over the surface, smooth it down with a squeegee or credit card, and let it cure.
The side with the film becomes the participant side, which sees only tinted glass. The opposite side acts as the observer window, transparent when the participant side is brighter.
For the effect to hold indoors, you need a bright overhead light or a few lamps on the participant side. Exterior windows matter less, because outdoor daylight usually keeps the balance strong enough without adding anything.
A few tiny bubbles left after smoothing disappear on their own as the adhesive sets. The method works best when you already have flat glass in place and want the one-way effect without re-silvering or replacing the pane.
6. Age Glass with Vinegar and Mirror Spray
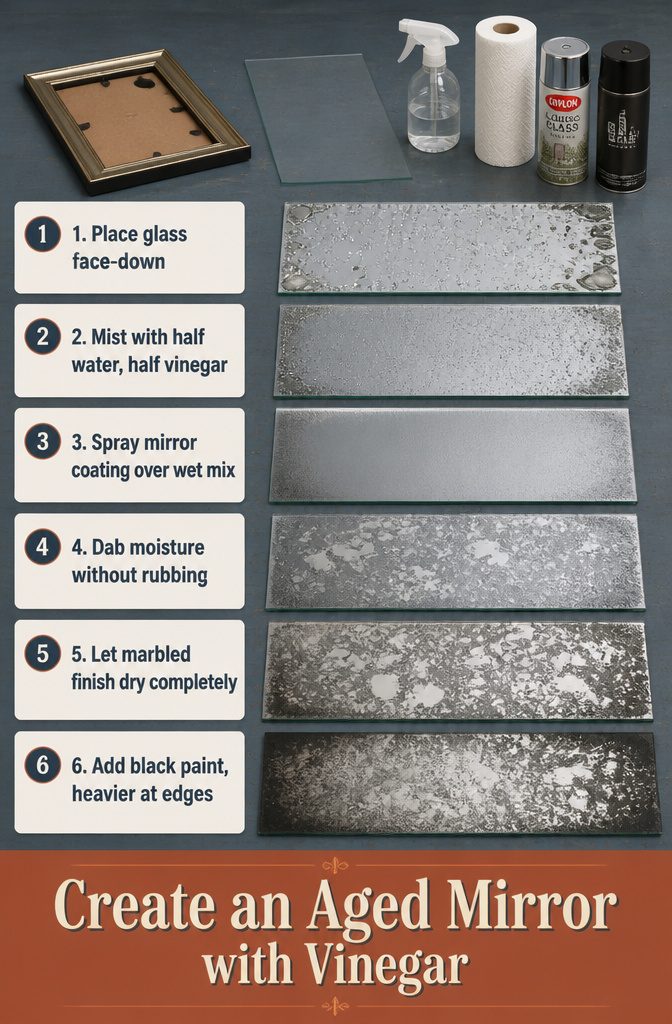
- Disassemble your picture frame and place the glass face-down on your work surface. The mirrored effect goes on the back, so orientation matters before you start spraying.
- Spray a half-and-half water-to-vinegar mix liberally over the glass. Concentrate heavier coverage in all four corners to create larger splotches there, and vary the droplet sizes across the rest of the surface for a random pattern.
- Spray Krylon Looking Glass Spray Paint directly over the wet vinegar mixture. A few passes give good coverage. Let it sit one minute.
- Dab away the moisture with a paper towel, gently enough that you’re not rubbing or scrubbing. You’re removing the vinegar mix, which will leave clear spots where the mirror coating didn’t bond.
- Let it dry completely. You’ll have a splotchy, marbled finish with larger voids around the edges.
- Add black spray paint for contrast. I spray it heaviest at the edges and let up toward the center so the antiqued pattern shows variation. Heavier black application brings out more detail; lighter keeps some translucency in the middle. Reassemble the frame once dry.
Silver Against Aluminum: Which Coating Reflects Better
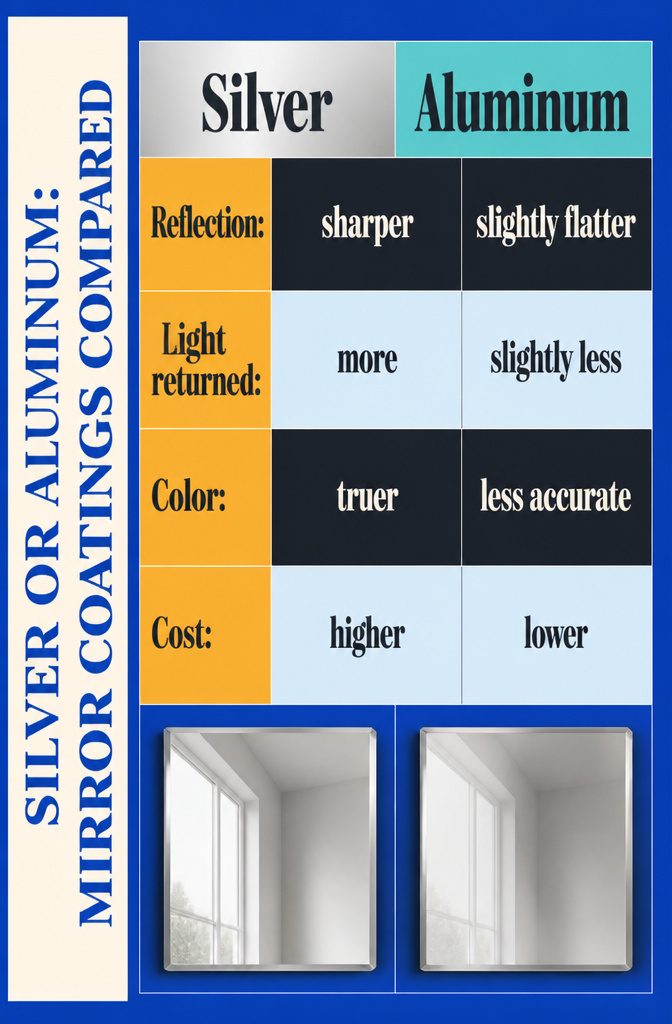
Silver gives you a sharper, more accurate reflection because it bounces back more light and preserves color better than aluminum.
That clarity makes a difference if the mirror will be used daily for anything precise—makeup, shaving, checking an outfit before leaving.
Aluminum costs less to apply and still works fine for decorative mirrors or places where the reflection itself isn’t the main point, but it does reflect slightly less light and can look a bit flat in comparison.
Silver is the traditional choice for a reason: it creates that crisp, true-to-life image people expect from a good mirror. Silver can corrode over time, so manufacturers often add a thin copper layer over it as a protective barrier.
If you’re making a mirror for everyday use and want the reflection to feel alive rather than dull, silver wins. If budget matters more than optical precision, aluminum still gets the job done.
Light Setup for One-Sided Mirrors
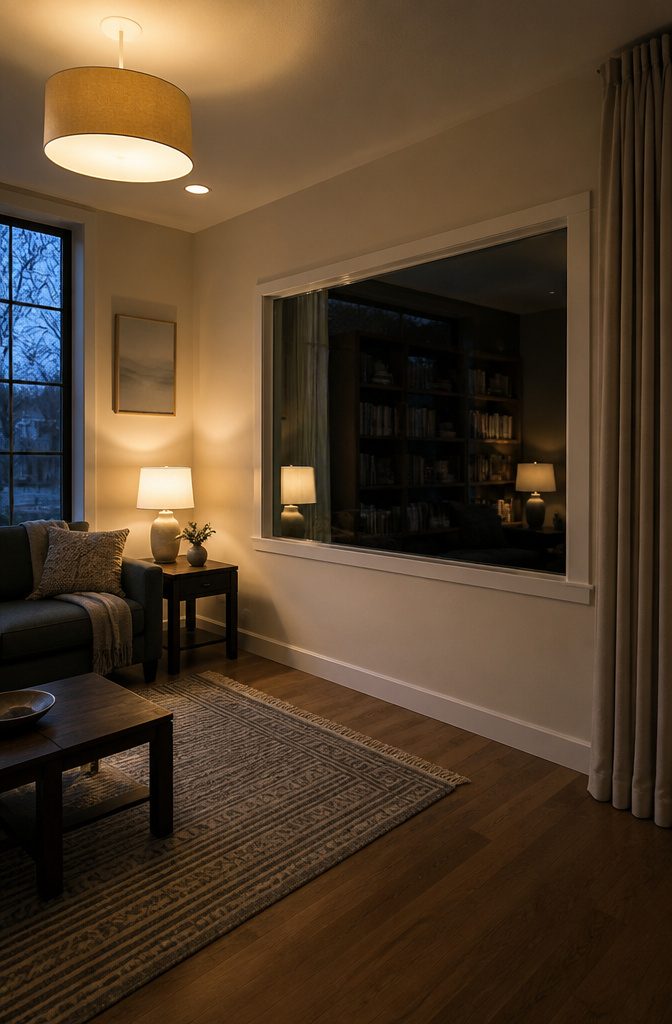
For a one-sided mirror to work, the side where the observer stands needs more light than the side being watched.
The brighter your room is relative to the space on the other side of the glass, the stronger the reflective illusion becomes.
I set up a couple of table lamps or a bright overhead fixture on the observer side, then keep the participant side dimmer. The contrast is what sells the effect.
If you’re applying film to an exterior window, lighting matters less.
Daylight flooding in from outside already creates enough differential that the interior stays reflective during the day. At night the balance flips, so anyone outside can see in unless you draw curtains or leave interior lights low.
Hanging the Finished Mirror

The hardware you need depends on how much the finished piece weighs and what kind of wall you’re hanging it on.
For a lightweight plywood frame with a small craft mirror, a sawtooth hanger on the back and a single nail into a stud will hold it without trouble.
I’ve used that setup dozens of times, and it stays put as long as the nail finds solid wood.
If you’re working with drywall and there’s no stud where you want the mirror, the single-nail approach won’t work.
In that case, use two sawtooth hangers spaced a few inches apart and drive two nails, or switch to a drywall fastener rated for the weight.
The two-point hang distributes the load better and keeps the mirror from tilting over time.
Check the frame weight before you choose hardware. A mirror that feels light in your hands can still pull free if the fastener isn’t matched to the wall material.
Controlling the Antique Pattern
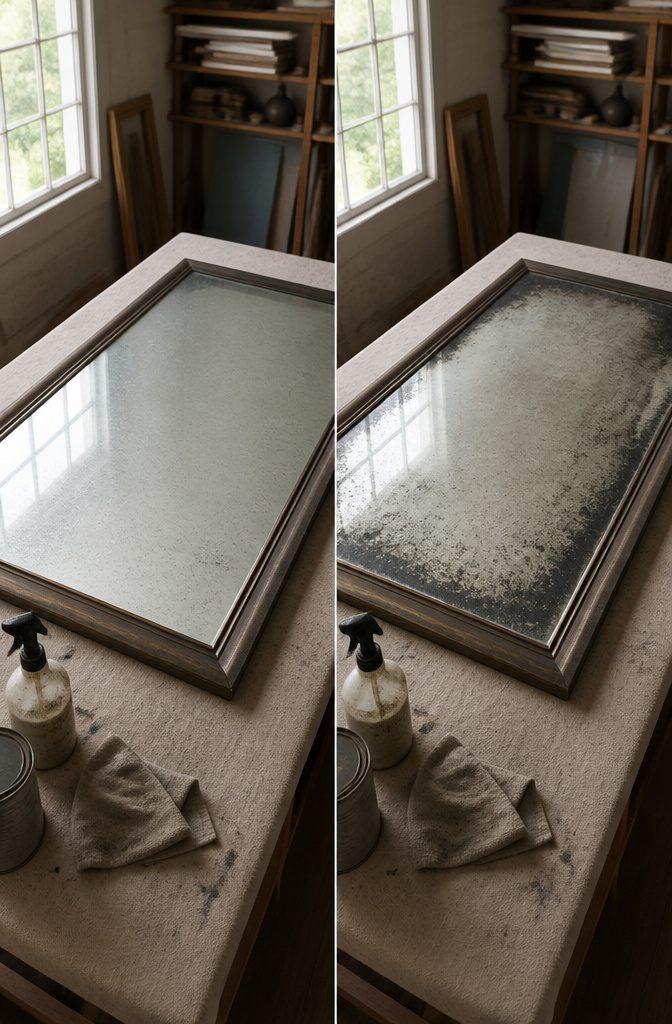
The more vinegar droplets you start with, the more black marks show up in the final finish.
I concentrated the mixture in all four corners for heavier distressing there, then used less spray paint toward the center to keep some variation. Larger splotches around the edges read more realistic than an even pattern across the whole surface.
Black paint is what gives the effect contrast.
You can spray it heavily for maximum definition, or let up toward the middle the way I did. The center of my glass has less black applied than the perimeter, which keeps the aging from looking uniform.
Once the black layer is down and dry, the antiqued look really comes through—the droplet work underneath suddenly has depth instead of sitting flat.
Frequently Asked Questions
What’s the difference between silver and aluminum mirrors?
Silver reflects more light and produces a sharper, more color-accurate image than aluminum.
Aluminum costs less to apply and works fine for decorative mirrors, but it reflects slightly less light and can look flatter in comparison. Silver is the standard for everyday use when you want a crisp, true-to-life reflection.
What thickness should I use for commercial mirrors?
Use 5 mm float glass for commercial mirrors and 3 mm for small decorative frames. The thicker glass holds up better in high-traffic spaces and gives a sturdier feel when mounted on walls or furniture.
Why do mirrors blacken at the edges over time?
The backing paint fails when moisture reaches the metal coating underneath.
Poor sealing during manufacturing, high humidity, and harsh cleaners all speed up the process. Once water gets through, the silver or aluminum layer oxidizes and turns black.
Can I order large-format mirrors with custom cutouts?
Yes, mirrors can be cut with notches and holes to specification. Confirm tolerances with the fabricator before ordering, since large sheets require precise measurements to fit around fixtures or openings.
Are there any anti-fog or moisture-resistant options?
Anti-fog films, heated pads, and moisture-resistant backing paint all reduce fogging and protect the coating from humidity. Heated pads keep the surface warm enough to prevent condensation, while specialized backing paint seals out moisture better than standard mirror paint.