

A pallet shed built on a proper foundation gives you 48 square feet of storage for $50 to $200 in materials and 12 to 16 hours of work across two weekends.
Most builds fail because people set pallets directly on soil, where ground moisture rots the wood within one season. Lift the structure on concrete blocks or poured piers and the frame stays dry for years.
1. Prepare and Level the Foundation

- Mark and clear the site. Stake out the shed footprint, then remove grass, roots, and debris down to firm soil.
- Level the ground. Use a 4-foot level and check in all directions. On a slope, excavate or build up the low side until the pad reads flat. Shimming the pallets later produces a floor that racks under load and cannot hold a square roof.
- Build the base. Two options work: a 4-inch compacted gravel pad, or solid concrete blocks at the four corners and mid-span. Space blocks no more than 4 feet apart to prevent sagging.
- Optional: pour concrete piers. Mix concrete in a wheelbarrow and pour into forms to create piers. Once set, place bricks around each pier for additional support.
- Add a treated 2×4 perimeter frame across the tops of your blocks before laying floor pallets. The frame ties the blocks together and gives the pallet deck a flat, ventilated platform.
A proper foundation matters because pallets set on bare soil absorb ground moisture and rot within one season. Lift them off the ground and air circulates underneath, keeping them stable and dry for years.
2. Build the Base Frame

- Cut six pieces of 2×6 timber at 8 feet and lay them out on your leveled foundation to form a rectangular perimeter frame. Two pieces run the long dimension, four pieces close the short sides and add center supports.
- Check the frame for square by measuring corner to corner. Both diagonals should match within a quarter inch. If they don’t, adjust before fastening anything.
- Level the frame in both directions. A bubble level works, but I find a four-foot level catches high spots faster. Shim low corners with treated wood scraps rather than letting the base rock.
- Add a treated 2×4 perimeter frame directly to the top of your concrete piers if the piers sit exposed. This distributes the load and gives you something solid to bolt through.
- Anchor the base frame to the foundation using 6–8 heavy-duty metal straps and 1/4 inch × 3.5 inch bolts with washers. Through-bolts beat lag screws here because they pull the frame tight to the piers and won’t back out over time.
3. Construct and Brace the Wall Frames
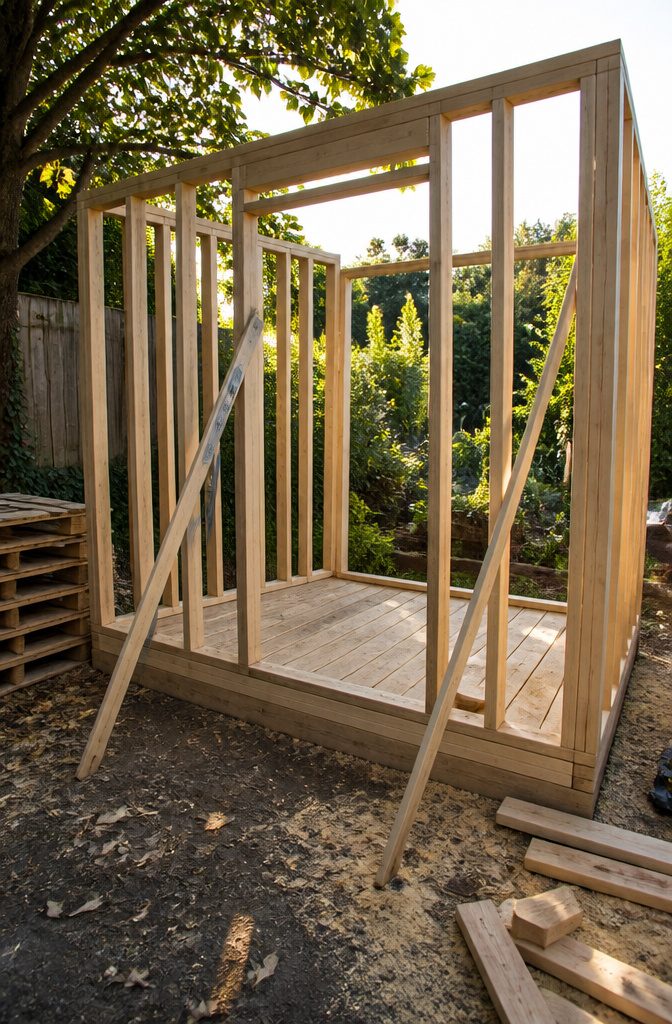
- Cut six 2×6 timbers to 8 feet for the top and bottom wall plates. You need four walls, so lay out pairs for each side with vertical studs in between. Space studs 24 inches on center for strength without adding unnecessary lumber cost.
- Frame the door opening on the front wall by running two full-height studs where the door will sit and adding a header across the top. The header carries the load above the opening. Leave a 36-inch gap for a standard pre-hung door.
- Nail or screw plates to studs using 3-inch fasteners. Pre-drill if the 2×6 splits easily.
- Stand each wall upright and fix the bottom plate to the base frame. Fasten through the plate into the perimeter timbers below, checking that each wall is plumb with a 4-foot level before driving the final screws.
- Brace walls temporarily with diagonal scrap lumber tacked from the top corner down to the base. This holds the wall steady while you square it.
- Fix walls to each other at the corners, screwing through one frame into the edge of the next. Check that corners meet at 90 degrees before fastening.
4. Fit Pallet Wall Panels and Close Gaps

Keep the straightest whole pallets for wall panels. Stand one pallet on edge per side (four total for a small shed), then sink a pressure-treated 4×4 post at each inside corner, eight feet long.
Bolt each pallet to its corner post with two 3/8-inch × 4-inch coach bolts minimum, drilling through the stringers. Then bolt adjacent pallets to each other at mid-stringer so the walls can’t spread under load.
- Sort pallets by condition. Pull any loose boards or protruding nails before you start. The straightest ones go to walls; damaged pallets get dismantled for cladding boards.
- Set corner posts. Sink posts into the ground or bolt them to your foundation blocks, one at each inside corner.
- Bolt pallets to posts. Drive at least two coach bolts through each pallet’s stringers into the post. Use washers.
- Bolt pallets to each other. Connect adjacent pallets at their mid-stringer with coach bolts to lock the frame together.
- Clad the gaps. Nail dismantled boards horizontally over the deck-board gaps from outside. For larger openings, 4×8 panels (16 mm thick) cover or reinforce the span.
You’ll need 8–15 HT-marked pallets or 10 reclaimed 48×40-inch pallets, four 4×4 posts, and 20 or more coach bolts for the full assembly.
5. Frame and Cover the Roof
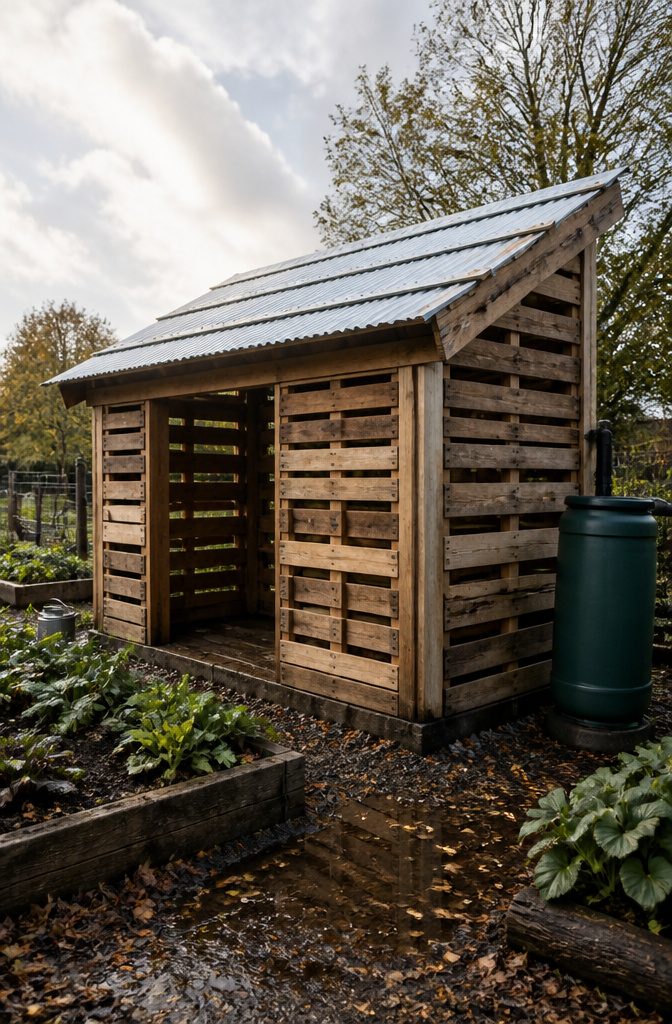
Frame and Cover the Roof
- Cut two simple rafters from 2×6 timber and secure them to the top wall plates, running from the rear wall to the front at a 10–15-degree minimum pitch. That slope keeps water from pooling. A ridge board is optional; if the span is short and the rafters meet cleanly at the peak, you can skip it.
- Sheath the frame with 4×8 OSB panels where you want a solid deck, or leave the sheathing out entirely if you prefer to fix metal roofing directly to the rafters. The latter saves material cost and cuts weight.
- Roll out roofing felt across the sheathing, overlapping each strip by at least 4 inches to block wind-driven rain. Nail battens over the seams to hold the felt flat.
- Install galvanized sheet metal or corrugated roofing, overlapping sheets according to the manufacturer’s instructions. Seal all edges with flashing to close gaps where water could wick underneath.
6. Assemble the Door and Finish Exposed Surfaces
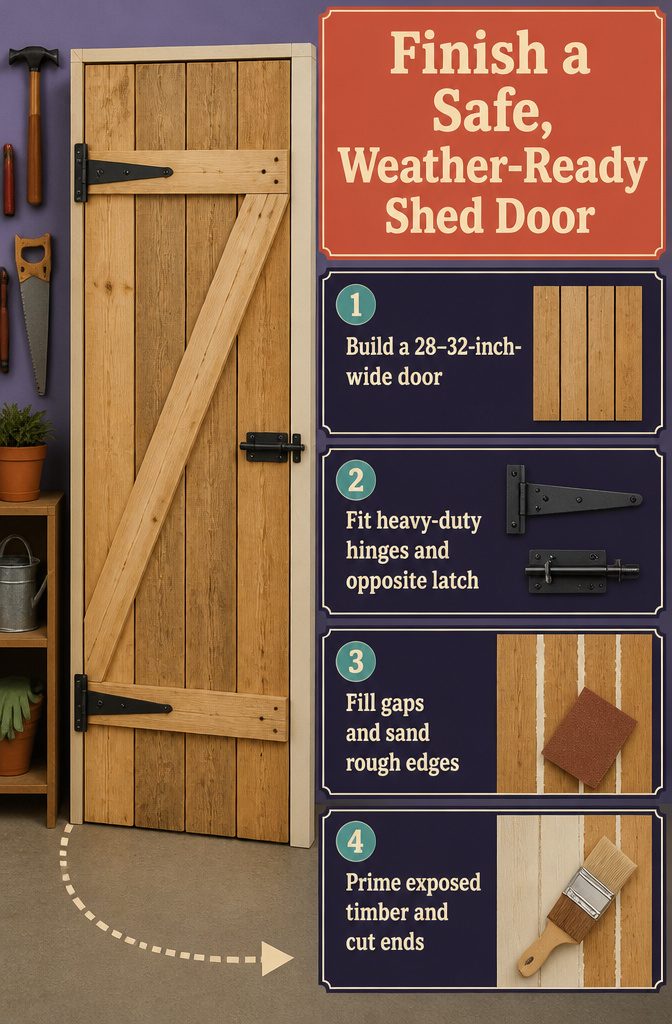
- Build the door from pallet boards or wood panels, cutting to a width of 28–32 inches so you can move a lawnmower or bike through without scraping the frame. I prefer pallet boards laid vertically with a Z-brace behind them, but a single panel is faster if you have plywood or OSB on hand.
- Attach the door with heavy-duty hinges, one set per door, and fit a latch on the opposite side. Position the hinges so the door swings outward, which keeps rain from pooling at the threshold.
- Fill any gaps between boards with exterior wood filler or caulk, then sand rough edges on the door and any exposed pallet surfaces inside the shed. Splintered wood catches gloves and shreds garden bags.
- Prime any exposed pallet timber as needed, especially cut ends and interior faces that won’t see paint later. Raw pallet wood soaks up moisture fast, and primer buys you years before rot starts.
7. Paint, Weatherproof, and Inspect

- Apply 1–2 gallons of oil-based exterior paint or wood preservative to every surface the weather will reach: walls, roof panels, door edges, and any exposed framing. Oil-based formulas sink into the grain and push out moisture better than latex, which matters when you are working with reclaimed wood that may have lived outdoors before. I coat the interior surfaces once if the shed will hold anything that rusts or molds, but if it is just garden tools, the outside matters more.
- Check every bolt and metal strap for tightness. Pallets shift as the wood dries, and a connection that felt snug during assembly can loosen after a week in the sun. I walk the perimeter and tug each joint by hand, then tighten anything that moves.
- Inspect the structure from the piers up. Look for splits in the base frame, gaps where wall panels meet, and any place the roof metal has lifted. Fix what you find now, before a storm turns a small gap into a rotted sill.
- Add shelves, hooks, insulation, or vents based on what the shed will hold. A simple rack along one wall keeps bags of soil off the floor; a pair of vents near the roof peak lets summer heat out if you are storing anything that sweats.
Choose Only HT-Marked Pallets
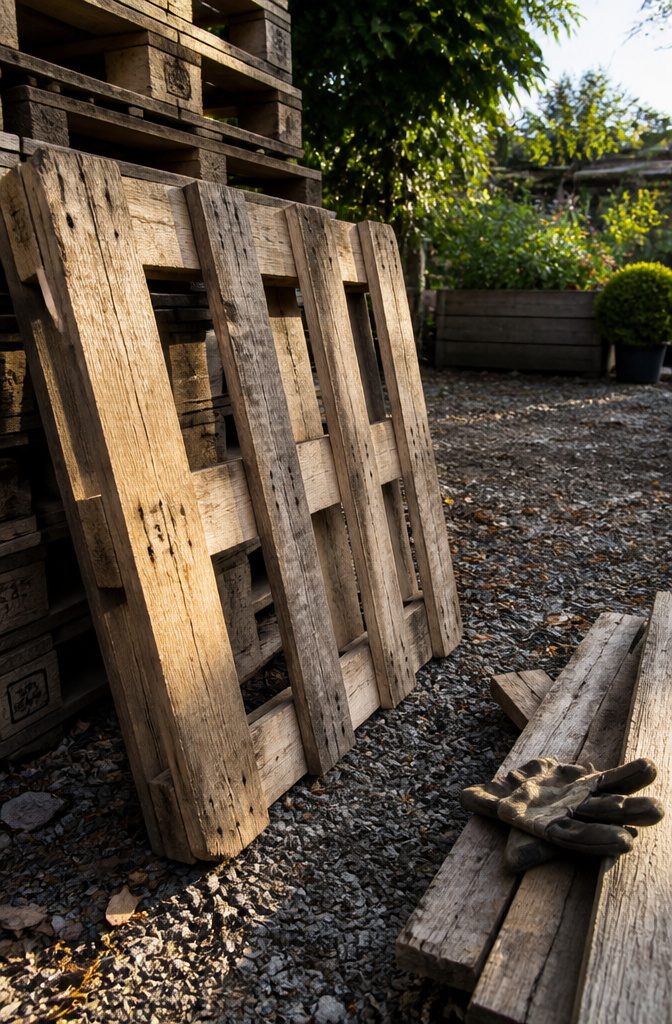
Only build with pallets stamped HT. Heat treatment means the wood was brought to a core temperature of 56°C (133°F) for at least 30 minutes under ISPM-15, the international phytosanitary standard.
No chemicals, no residue, and safe for a backyard shed that will sit near soil and plants.
The stamp to avoid is MB, which indicates methyl bromide treatment.
The US phased out methyl bromide for most agricultural uses around 2005, so finding it on a locally sourced pallet is unlikely, but the risk is real enough to check every board.
Methyl bromide leaches into garden soil, and if you ever burn scrap from the build, MB-treated wood releases the fumigant as a concentrated hazard. Always check the stamp before the first board goes up.
Most garden centers, hardware stores, and furniture retailers have pallets available.
The standard size is 48×40 inches. Wear gloves and eye protection when handling reclaimed wood, and use a dust mask when cutting or sanding.
What You Need to Build It

You need 10 to 15 heat-treated pallets, four pressure-treated 4×4 posts at 8 feet, and between $50 and $200 in hardware for a basic build. Below is the full materials list:
- 10–15 HT-marked pallets, 48×40 inches preferred, whole panels plus extras to dismantle for cladding
- Four 4×4 posts at 8 feet, pressure-treated for ground contact
- Six 2×6 timbers at 8 feet for base and roof framing
- Seven 4×8 wood panels, 16 mm thick, for wall backing
- Exterior screws, 3 inches, galvanized or coated, box of 200
- Coach bolts or 1/4-inch bolts, 3.5–4 inches long, 14–20 pieces with washers
- Six to eight bags of concrete mix for piers
- Heavy-duty metal straps, 6–8 pieces
- Roofing material: felt and battens or galvanized sheet metal to cover roughly 8×6 feet, plus 20 percent for overlap
- Oil-based exterior paint or wood preservative, 1–2 gallons
- Door hinges and latch, one set
- Four to six pieces of 18-inch rebar for securing piers
- Melamine board forms or reusable concrete forms for pouring piers
Tools you need: circular saw, drill, pry bar, and a 4-foot level.
Cost and Time to Expect

Materials for a pallet shed run $50 to $200 if you source pallets for free and buy only hardware and roofing. A pre-cut wood kit for a comparable structure starts around $600.
The gap looks wide, but it narrows once you account for time. Expect to spend 12 to 16 hours on the build spread across two weekends, and the finished shed will be smaller and rougher than what arrives in a kit.
An 8×6-foot pallet shed built for under $500 in materials is realistic if you can find heat-treated pallets locally and handle basic carpentry.
If your weekend time carries high value or you need weathertight storage immediately, the kit wins despite the higher upfront cost.
When a Kit Makes More Sense

A kit may suit you if you cannot find clean HT pallets, need the shed finished in a single day, or require it weathertight from day one.
Most pre-cut kits go up in under eight hours with matched hardware and milled components sized for two people.
The geometry is factory-cut rather than assembled by eye, and the roof pitch follows an engineered spec instead of a rough angle you built yourself.
The pallet build wins on materials. Pallets are often free, and hardware plus roofing runs $50 to $200 total.
A comparable pre-cut wood kit starts around $600. The trade is a full weekend of labor and a rougher, smaller result than a kit delivers.
Pallet walls have natural gaps, and the structure is only as square as your assembly. For a potting station or seasonal tool overflow, that works.
For year-round storage of water-sensitive equipment, those rough seams become a liability. If your weekend has high value or you need a weathertight structure quickly, the math shifts toward buying.
Layout and Use After the Build

Once the shed is standing, the 48-square-foot floor (eight by six feet) goes further with a deliberate layout.
Storage sheds want shelving along one wall and enough floor space near the entrance for a mower or bike to roll in without dragging past obstacles. Workshops need a workbench, pegboard for hand tools, and hooks for anything that hangs.
Recreational use calls for seating and open floor area instead of dense shelving. I place bulky items near the door regardless of the shed’s role, because wrestling a wheelbarrow past three rows of boxes is how things get damaged.
Insulation, windows, and vents depend on how much time you spend inside. A potting shed benefits from ventilation; a hobby space where you sit for hours needs both insulation and a window.
Adding electrical wiring or plumbing requires a licensed professional, not a weekend permit workaround. A 28- to 32-inch door width lets wheeled equipment pass without scraping the frame.
Frequently Asked Questions
Is building a pallet shed cheaper than buying a kit?
Building from pallets costs $50 to $200 in hardware and roofing, while a pre-cut kit starts around $600.
The pallet build saves money on materials but requires 12 to 16 hours of labor across two weekends. If you can source free HT pallets locally and have the time, building is the cheaper path.
Do I need a permit to build a pallet shed?
Permit requirements depend on local building codes and the shed’s size. Check with your local building authority before starting construction to confirm whether your project needs approval.
Can I build a pallet shed on uneven ground?
No, you need to level the ground first by excavating the high side or building up the low side until a 4-foot level reads flat in all directions.
Shimming pallets later produces a floor that racks under load and cannot hold a square roof.
How do you join pallets together to make a shed?
Bolt whole pallets to 4×4 posts at each inside corner using at least two 3/8-inch coach bolts through the stringers, then bolt adjacent pallets to each other at mid-stringer. Nail dismantled boards over the gaps from outside to close the frame.
Are pallet sheds weatherproof?
Pallet sheds can be made weatherproof with proper construction, a sloped roof pitched at 10 to 15 degrees minimum, overlapping roofing felt, and 1 to 2 gallons of oil-based exterior paint on all surfaces.
Natural gaps between pallet boards remain unless you clad them with additional boards or panels.
How durable are pallet sheds?
A pallet shed built on a proper foundation with HT pallets, painted surfaces, and regular maintenance can last several years.
Pallets set directly on bare soil rot within one season, so lift them off the ground with gravel or concrete blocks.
What maintenance does a pallet shed require?
Check every bolt and metal strap for tightness after the wood dries, inspect for splits in the base frame and gaps where panels meet, and maintain the roof seal. Reapply paint or wood preservative as needed to keep moisture out.
Can I customize the size of my pallet shed?
Yes, adjust the base frame dimensions and number of pallets to fit your yard space and storage needs. The standard 48×40-inch pallet size gives you a modular unit to work with when planning the layout.
Is building a pallet shed eco-friendly?
Reusing pallets reduces landfill waste and demand for new timber. Only use pallets stamped HT (heat-treated) rather than MB (methyl bromide), which contains chemical residue that leaches into garden soil.
Will pallets rot outside?
Pallets rot quickly when placed directly on soil because they absorb ground moisture. Lift them off the ground with a gravel pad or concrete blocks so air circulates underneath, then coat all surfaces with oil-based paint or wood preservative.
What is the cheapest way to make a shed floor?
A 4-inch compacted gravel pad or concrete blocks spaced no more than 4 feet apart both work as a foundation, with a treated 2×4 perimeter frame across the tops before laying floor pallets.
The gravel option is cheaper and faster than pouring concrete.