

A folding drop-leaf table with hinged side frames costs around $75 in materials and seats four to six when open, but most builders stain too late.
Once the base is assembled, you can’t work water-based stain into tight corners or get even coverage across joined frames, so the finish comes out streaky or pooled.
Stain each side frame separately after sanding and before you attach the aprons or hinge anything together.
1. Assemble the Four Side Frames
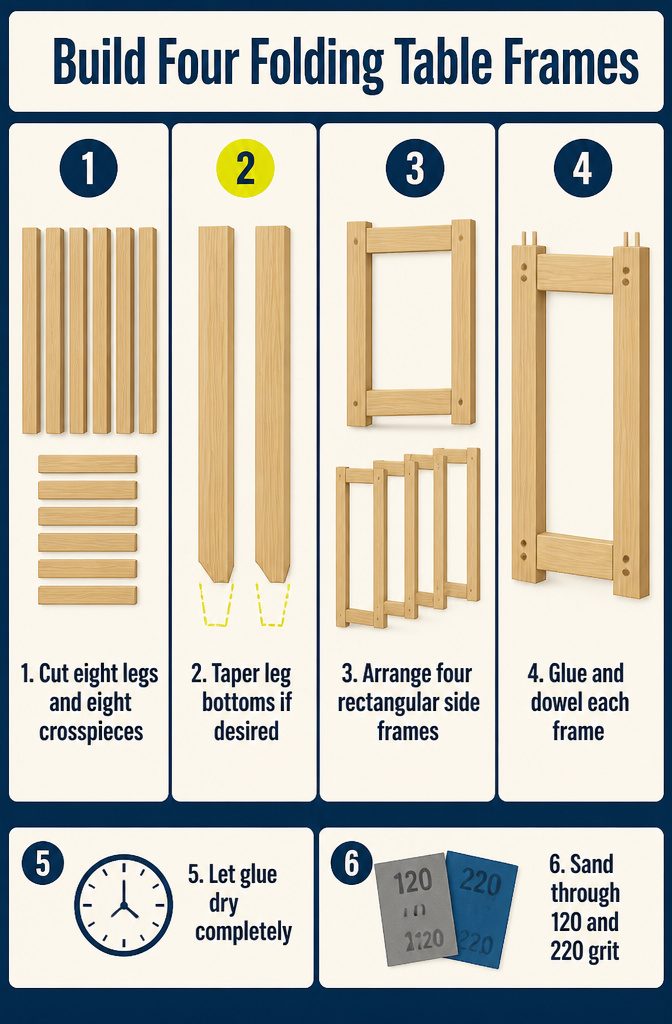
- Cut eight 1×3 pieces for the legs and eight shorter 1×3 pieces to run between them as crosspieces. You’re building four side frames total — two per side of the table, so they’re doubled up when the table folds down.
- Taper the bottom of each leg with a jigsaw if you want a little shape. Optional step; skip it if you prefer straight legs.
- Lay out one leg and two crosspieces to form a rectangular frame. Repeat for the other three frames.
- Join each frame with wood glue and dowels. Pocket holes work, but they’ll show on the finished table. I used dowels to keep the joinery invisible.
- Let the glue dry completely before moving the frames.
- Sand each frame smooth, working through at least 120 and 220 grit.
- Stain the frames now, before assembly. Water-based stain dries fast — too fast to apply evenly once the whole table is together. I used Minwax Water Based Wood Stain in Driftwood, but any water-based formula will reward you for staining small pieces separately rather than fighting it on a large surface.
2. Assemble the Base
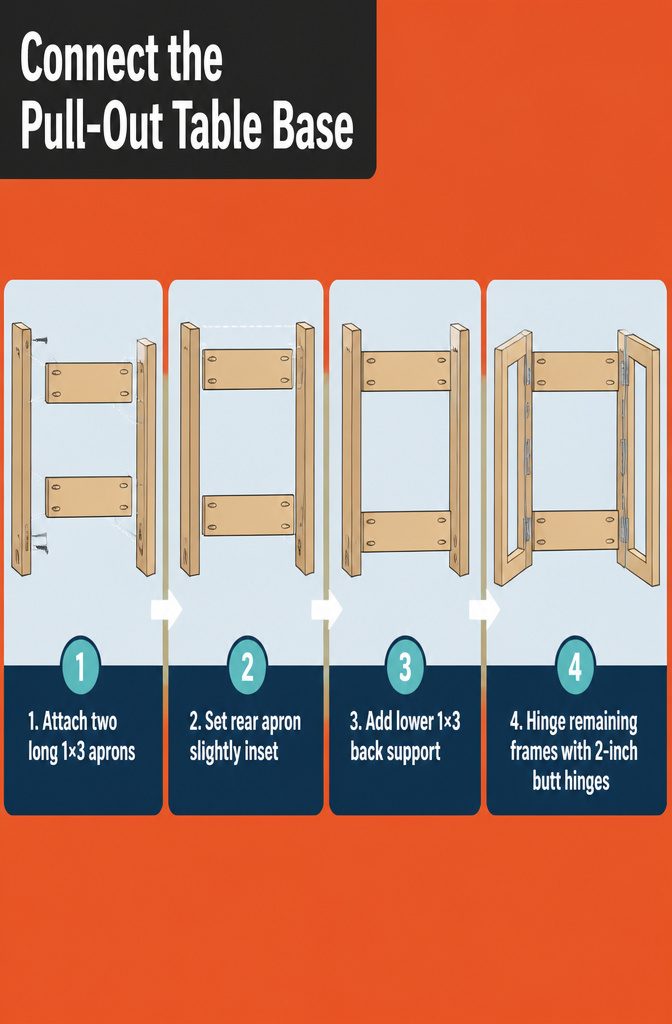
- Cut two longer 1×3 boards for the aprons and connect the two side frames you set aside earlier. Attach these aprons with pocket holes and screws. The back apron installs slightly inset from the back edge, while the front apron sits flush.
- Add a lower 1×3 piece flush to the back, positioned between the side frames toward the bottom. I use wood screws through the sides for this connection. Pocket holes work fine here too, but screw heads are less visible than pocket holes in this spot.
- Hinge the remaining two side frames to each side using 2-inch cabinet butt hinges along the back edge. This lets the frames swing outward to support the drop leaf when the table opens.
3. Build the Top
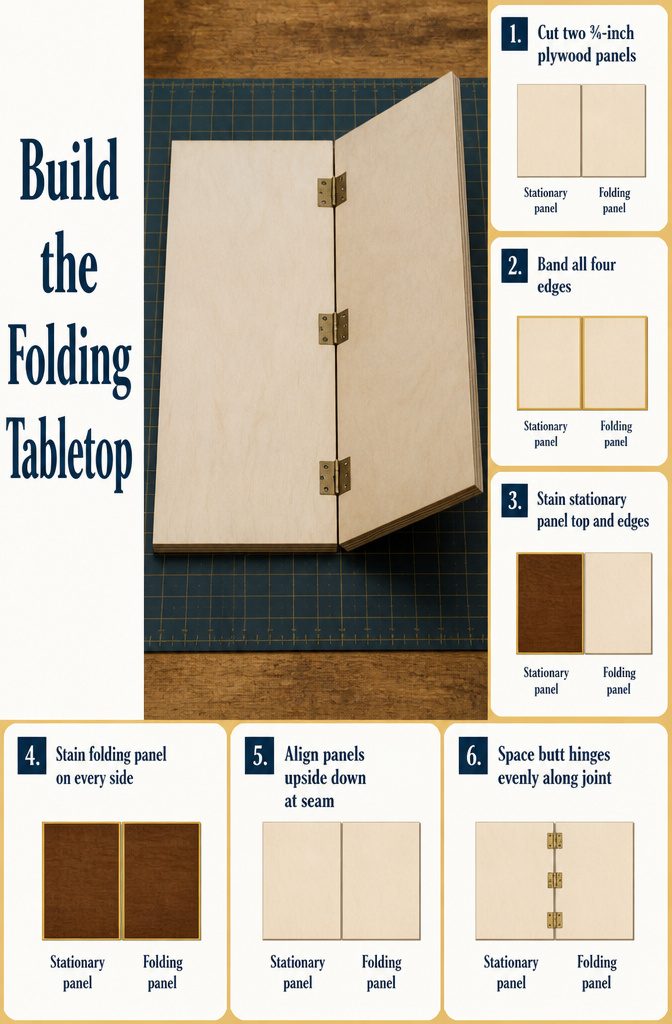
- Cut two pieces of ¾-inch plywood for the top: one stationary panel and one that folds. Plywood stays flatter and more stable than solid wood glued up from boards.
- Apply iron-on edge banding to all four edges of both panels if you want them to look more like solid wood. The banding hides the plies.
- Stain the top surface and edges of the stationary panel. You won’t see its underside when the table is finished, so leave that bare.
- Stain all sides of the folding panel — top, bottom and edges — because both faces will be visible depending on whether the panel is up or down.
- Flip both panels upside down on your work surface and position them edge to edge at the seam where they’ll meet.
- Attach the two panels together at the seam with butt hinges, spacing them evenly along the joint. The hinges let the folding panel swing up when you need the extra surface and fold down flat when you don’t.
4. Attach the Top and Demonstrate Operation
- Drill pocket holes along the inside edge of the front and back aprons so they won’t show once the top is on.
- Center the stationary panel on the base with the folding side toward the back, then drive pocket-hole screws through the apron into the underside of the top to lock it down.
- Cut a length of 1×3 to act as a faux apron under the folding panel. This piece adds visual weight and helps stabilize the extended top.
- Glue the faux apron to the underside of the fold-down panel, positioning it so it fits snugly between the back legs without rubbing when the top moves.
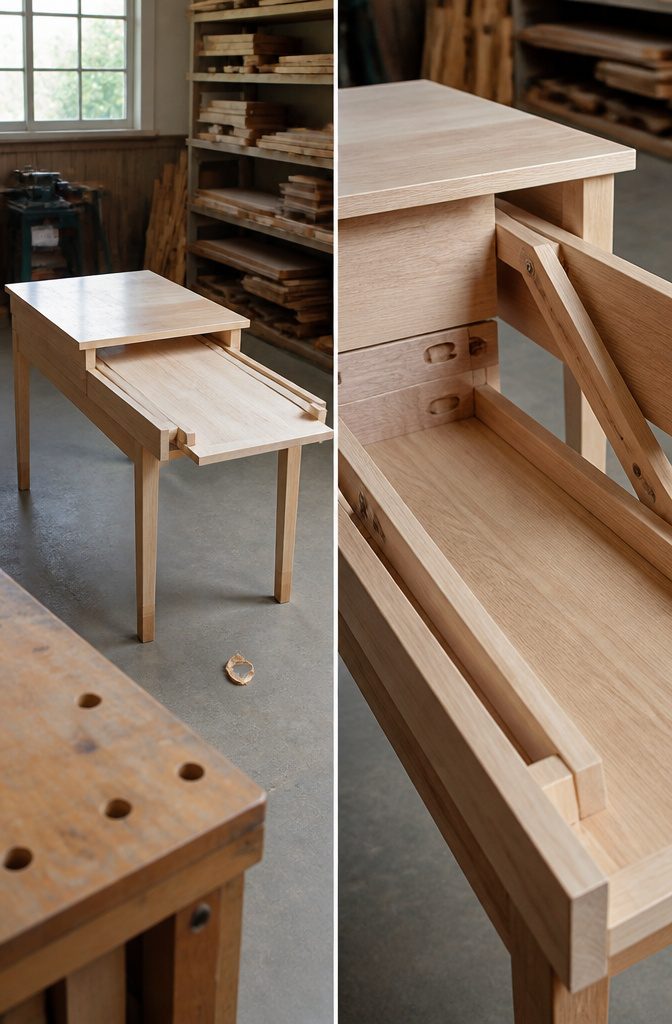
- Once the glue is dry, test the motion: lift the rear panel that overhangs the back, then swing both side frames back until they meet the faux-apron edges.
- To close, swing the side frames forward and lower the top panel. The whole shift takes a few seconds and needs no tools.
5. Mill Stock and Taper the Legs

- Mill your apron and leg stock about ⅛ inch oversize in thickness and width. That extra margin lets the wood move as internal stresses release without dropping below your final dimensions.
- Let the milled stock sit for a week before you touch it again. Wood can warp or twist after the first pass through the planer, especially if it held tension from how it was dried or stored. A few days of rest lets that movement happen before you commit to final dimensions.
- After the wait, re-mill all four faces: flatten one face on the jointer, square an edge to it, then run the piece through the planer to bring it to final thickness. Rip to final width on the table saw with the square edge against the fence.
- Set up a taper jig on your table saw with the blade at 90 degrees. Mark the taper layout on two adjacent faces of each leg, then position the jig so the blade cuts on the waste side of your line. Make the first cut, rotate the leg to the adjacent face, and make the second. Four legs, eight cuts.
6. Shape the Aprons
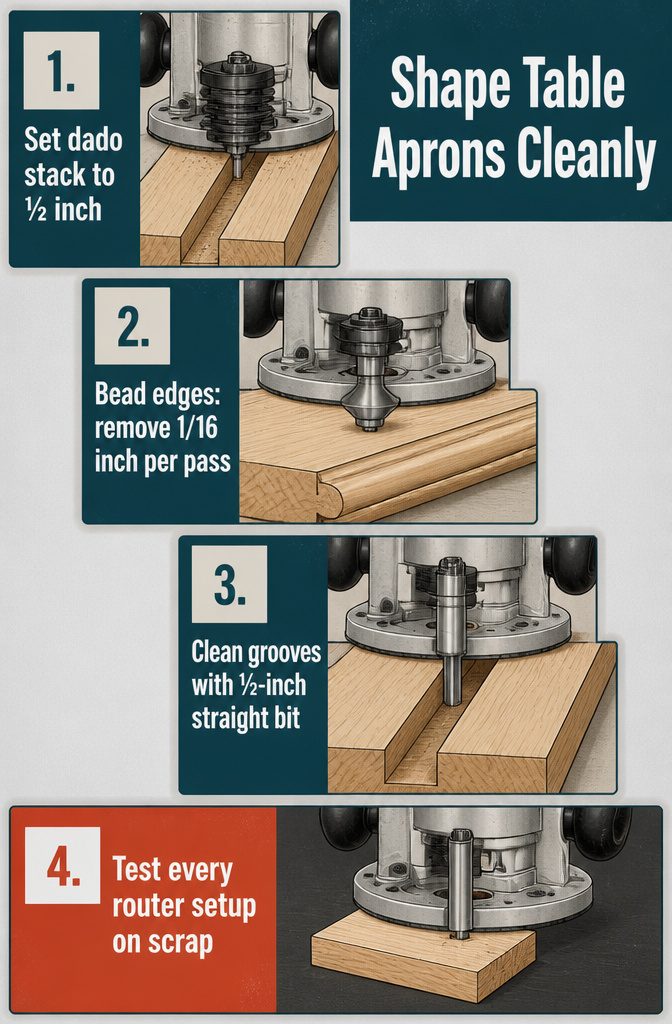
- Set your dado stack to ½ inch and cut the two grooves that will hold the sliding mechanism, removing most of the waste in one pass to keep the work clean and the grain intact.
- Fit a bullnose bit in the router and form the decorative beads along each apron edge, taking off roughly 1/16 inch per pass so the wood doesn’t tear out or burn from too aggressive a cut.
- Switch to a ½-inch straight bit and clean the bottoms of the grooves where the dado left them slightly rough or uneven.
- Run every router setup on a piece of scrap first, checking depth, feed direction and bit sharpness before you shape the actual aprons, because a mistake here means milling new stock and starting over.
7. Cut the Tabletop and Apron Grooves

- Mark the rabbet line ⅛ inch in from the edge on the top face of the plywood, running it all four sides. This tongue will sit in the grooves you cut in the aprons and keep the top from shifting.
- Set your table saw blade to ⅛ inch high and rabbet all four edges of the tabletop. The tongue left behind should measure ⅛ inch deep and as wide as the plywood thickness minus the rabbet pass.
- Switch to a ⅜-inch dado blade and cut grooves along the back face of each apron piece. Raise the blade just past ⅛ inch — slightly deeper grooves give excess glue somewhere to go instead of forcing the joint to sit proud.
- Test-fit one apron to the tabletop tongue before gluing. The fit should be snug without binding, and a faint gap at the bottom of the groove is fine.
8. Miter the Aprons
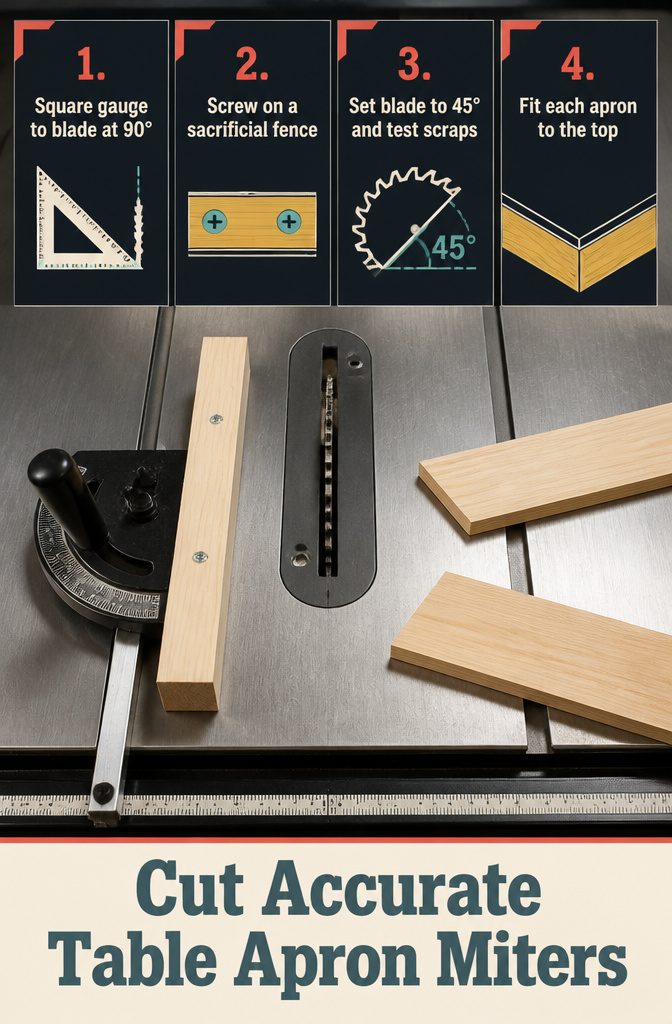
- Square the miter gauge to the blade using a machinist’s square or triangle. Set the gauge at exactly 90 degrees, lock it, and check both sides of the blade to confirm the fence sits perpendicular. Even a quarter degree off will throw the miters at the corners.
- Attach a sacrificial wood fence to the face of the miter gauge with two screws. The fence should be straight, flat, and wide enough to support the full width of the apron stock. This backing prevents tearout and gives you a clean reference for repeat cuts.
- Tilt the blade to 45 degrees and verify the angle with a square or dedicated miter gauge. Most saw scales are close but not perfect. I test the setting by cutting two scraps, flipping one, and checking whether the joint closes tight.
- Cut the first miter on each apron piece, then hold the mitered end against the underside of the top to mark the opposite cut. Fit each apron individually rather than cutting all four to a calculated length, since small differences in the top dimensions will show up at the corners.
9. Join the Top With Splines
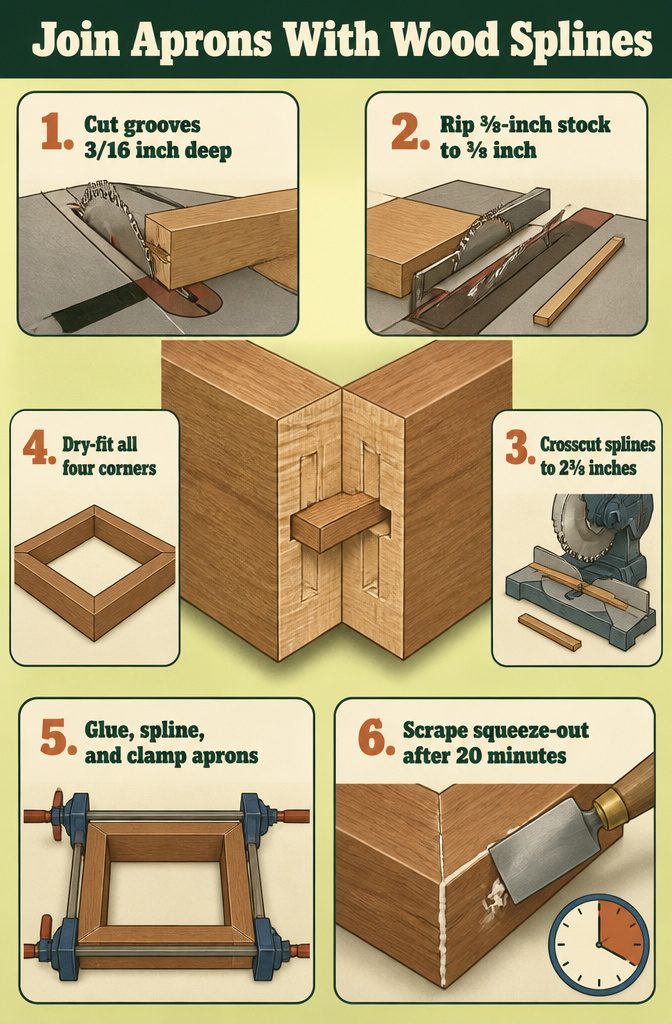
- Cut grooves 3/16 inch deep into each mitered apron face using a table saw with the blade tilted to match the miter angle, which keeps the groove perpendicular to the joint line.
- Rip spline stock from ⅜-inch-thick material down to ⅛ inch, then crosscut the strips into pieces 2⅝ inches long so they span the full depth of both mating grooves.
- Dry-fit the aprons with splines in place to check that all four corners pull tight and the assembly sits flat before any glue goes on.
- Apply glue to the spline grooves and the apron faces, insert the splines, and bring the corners together with bar clamps across opposite sides.
- Scrape off squeeze-out with a chisel or card scraper after about 20 minutes, when the glue has gelled enough to peel cleanly but has not fully hardened.
10. Fit Leg Hardware and Finish

- Orient the legs with the tapered faces pointing inward and set them into the mounting brackets. The narrow end belongs at the top, so the leg widens as it reaches the floor.
- Mark the through-bolt holes at 5/32 inches and the machine-bolt holes at 3/16 inches, then drill them on a drill press. Perpendicular holes matter here — a handheld drill wanders enough to throw off how the leg sits in the bracket.
- Round the top of each leg where it meets the bracket, then ease all the sharp edges with sandpaper. I work through 120-grit to knock down any roughness, then finish at 220.
- Press felt pads onto the bottom of each leg to protect the floor.
- Apply the first coat of satin Arm-R-Seal with a clean cloth, working with the grain. Wait eight hours, then scuff-sand lightly with 400-grit paper before the second coat. Repeat for the third coat.
- Let the finish cure for at least 24 hours — longer if the room is cool or humid — then rub paste wax into the surface with 0000 steel wool and buff it out with a soft cloth.
What Folding Function and Space Use Mean for Your Build
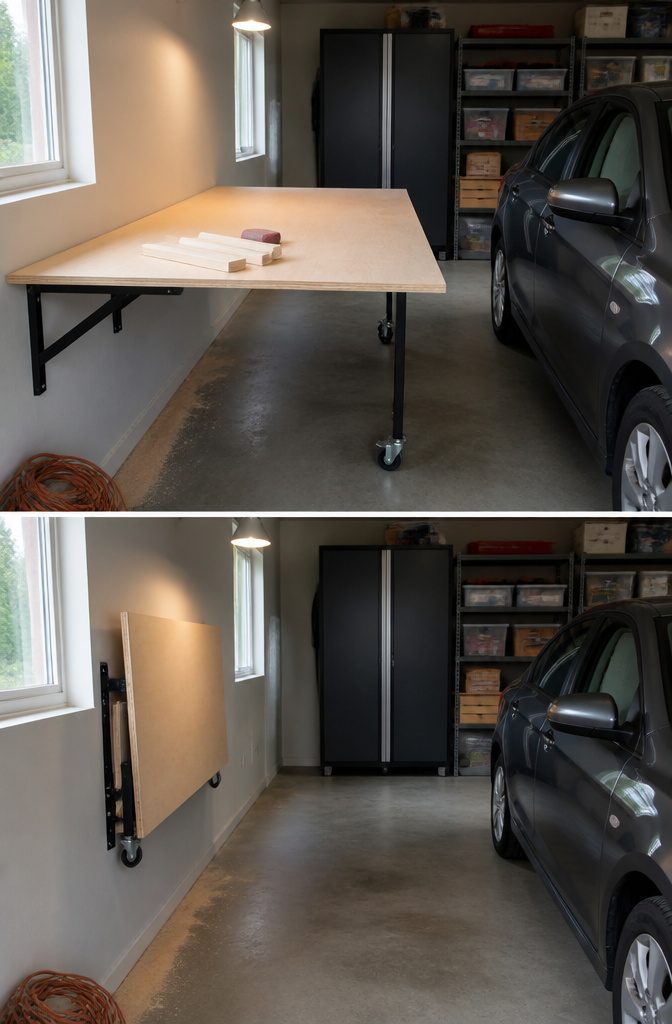
All four builds change footprint or work surface to fit the space you actually have.
The outfeed table folds flat against the wall when you’re not using it, opening out to extend the work surface for cutting and milling large workpieces.
Closed, it sits about 70 cm deep; open, you gain a full additional table. The drop leaf design folds down into a console or desk, then opens to seat four to six people for dinner or games.
The wall-mounted folding table stays slim enough that a car can park beside it, then drops down on bracket and caster wheels to give you a 3×6 ft work surface you can roll where you need it.
The card table folding extension tucks away to save space until you need the extra surface for projects or hobbies. The question is whether you need the table to disappear completely or just shrink enough to leave circulation room.
Plans, Tools and Materials You Need
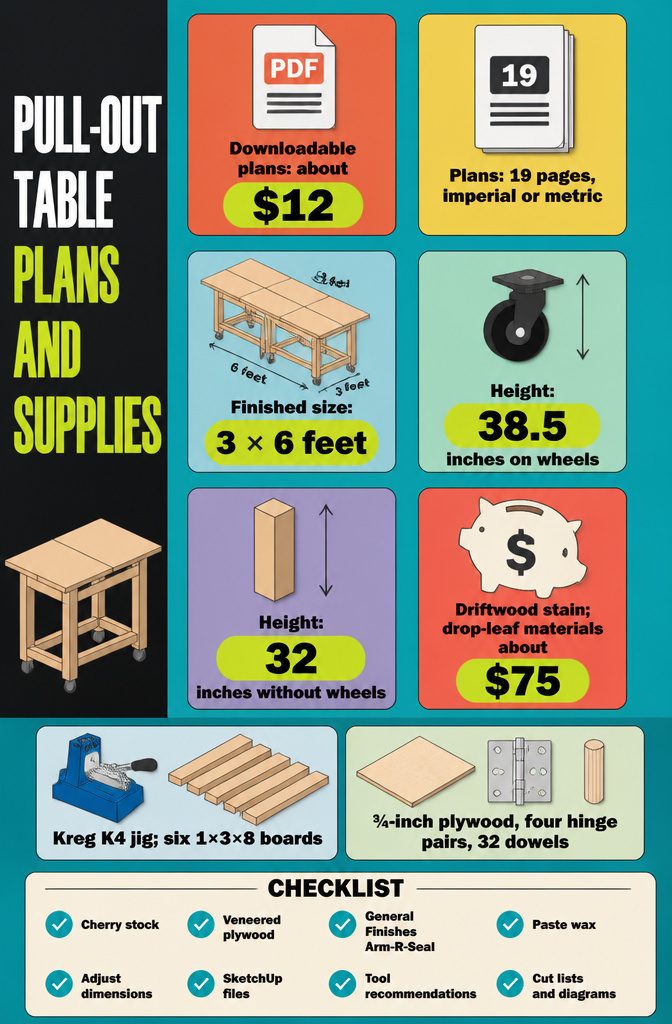
Most pull-out table plans land in one of two camps: downloadable PDFs with full cut lists and diagrams, or free project posts that expect you to adapt as you go. Here’s what the builds actually call for.
Downloadable plans with measurements run about $12 and include cut lists, 3D diagrams, and tool recommendations across 19 pages.
You get imperial or metric versions, and the finished table sizes out at 3 × 6 feet with a height of 38.5 inches on wheels or 32 inches without.
Free build guides supply their own lists:
- Kreg K4 Pocket Hole Jig for joining the frame
- Six 1×3×8 boards for the base structure
- One 4×4-foot sheet of ¾-inch plywood for the top
- Four pairs of butt hinges to attach folding sections
- 32 dowel pins sized ⅜ × 1½ inches
- Minwax Water Based Wood Stain in Driftwood
The drop-leaf version costs around $75 in materials.
Higher-end plans shift to cherry stock, veneered plywood, General Finishes Arm-R-Seal, and paste wax for the finish. Some include SketchUp files if you want to adjust dimensions before cutting.
Frequently Asked Questions
How much does it cost to build a pull out table?
A basic drop-leaf pull-out table costs around $75 in materials, including six 1×3×8 boards, one 4×4-foot sheet of ¾-inch plywood, hinges, dowel pins, and stain.
Downloadable plans with full cut lists and diagrams run about $12 if you want measured drawings. Higher-end builds using cherry stock and veneered plywood will cost more.
What tools do I need to make a pull out table?
You need a Kreg K4 Pocket Hole Jig for joining the frame, a table saw for cutting and mitering, a router with bullnose and straight bits for shaping aprons, and a drill press for perpendicular holes in the leg brackets.
A jigsaw, clamps, and sanders round out the list. Most builds assume you have access to a jointer and planer if you’re milling your own stock.
What type of wood is best for a pull out table?
¾-inch plywood works best for the top because it stays flatter and more stable than solid wood boards glued together.
The base structure uses 1×3 boards, which can be pine for budget builds or cherry for higher-end versions. If you want the plywood edges to look like solid wood, apply iron-on edge banding to hide the plies.
How long does it take to build a pull out table?
Plan for at least a week between milling stock and final assembly, since milled lumber needs to sit for about 7 days to release internal stresses before you cut to final dimensions.
Active work time includes frame assembly, staining (which requires drying between coats), top construction, and finishing with 3 coats of sealant spaced 8 hours apart, plus 24 hours of cure time.
How do you attach hinges to a fold down table?
Attach 2-inch cabinet butt hinges along the back edge where panels or frames meet, spacing them evenly along the joint.
For the folding top panels, flip both pieces upside down and position them edge to edge at the seam, then screw the hinges into the underside so they let the panel swing up for extra surface or fold down flat.
For the side frames that swing out to support the leaf, mount the hinges along the back edge of the base.
What size should a pull out table be?
A full-size pull-out work table measures 3 × 6 feet with a height of 38.5 inches on wheels or 32 inches without.
A drop-leaf dining version sized to seat 4 to 6 people will have a stationary panel and one folding panel, with total dimensions depending on how much space you have when closed versus open.
Most plans offer both imperial and metric versions so you can adjust to your room.